Growing your own food is a wonderful feeling. Even if you’re not fully providing for all your meals, and only getting an occasional snack out of the garden, it’s amazing to watch something grow, care for it, and literally taste the fruits (and vegetables) of your labors. Hydroponic growing is even more amazing, because it takes a process that works perfectly fine on its own, honed by four billion years of natural evolution, and adds a bunch of unnecessary technical complexity. And if there’s one thing I love, it’s unnecessary technical complexity.
Vertical gardening makes the social media rounds on a seemingly regular basis as something that’s going to save the world. Combine the water savings of hydroponic growing with the space savings of vertical gardening, and you’ve got a winner. And, of course, another technical challenge that no one asked for, because now the water has to flow up instead of the normal down.
It takes a special type of idiot to look at a process that’s been feeding humanity reliably for over 11,000 years and think “I can make that harder than it needs to be”. Thankfully, I am just this type of idiot.
Why not just buy one?
Obviously, I’m not the first to dream up growing small plants in a tower configuration, and there are easily-purchasable options out there. But holy cow are they expensive, many ranging from several hundred to thousands of dollars. At the end of the day, it’s PVC, there’s no reason for all that extra expense. The build below should be doable for under $100.
Besides, it’s more fun if you build it yourself.
Building the tower!
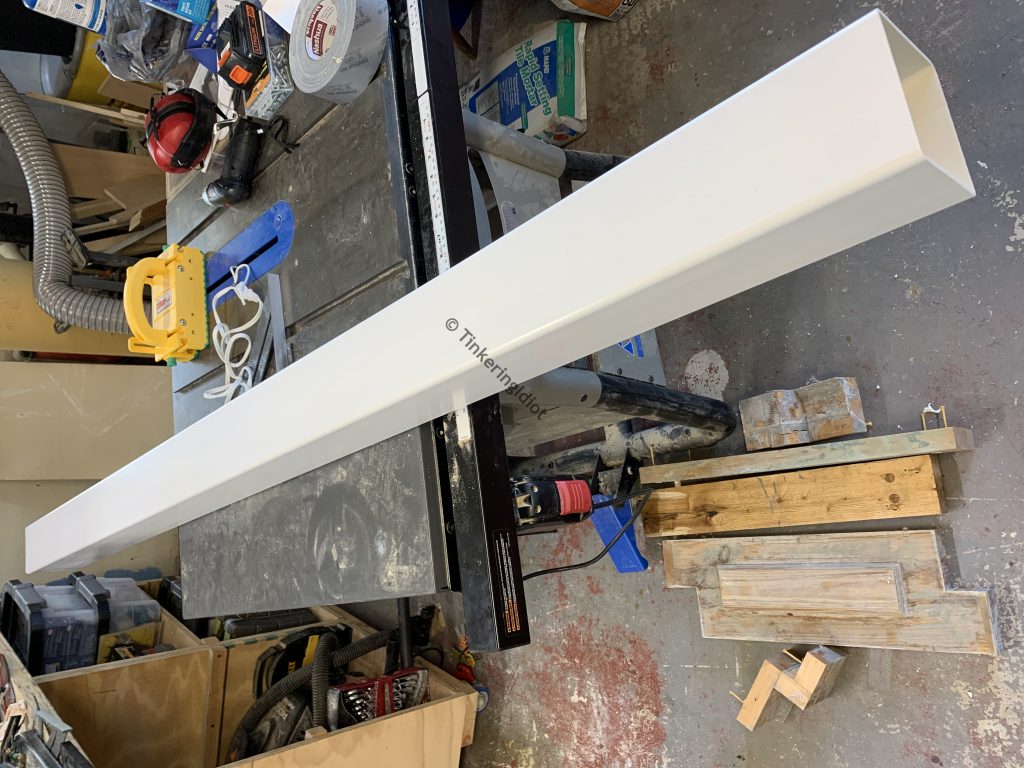
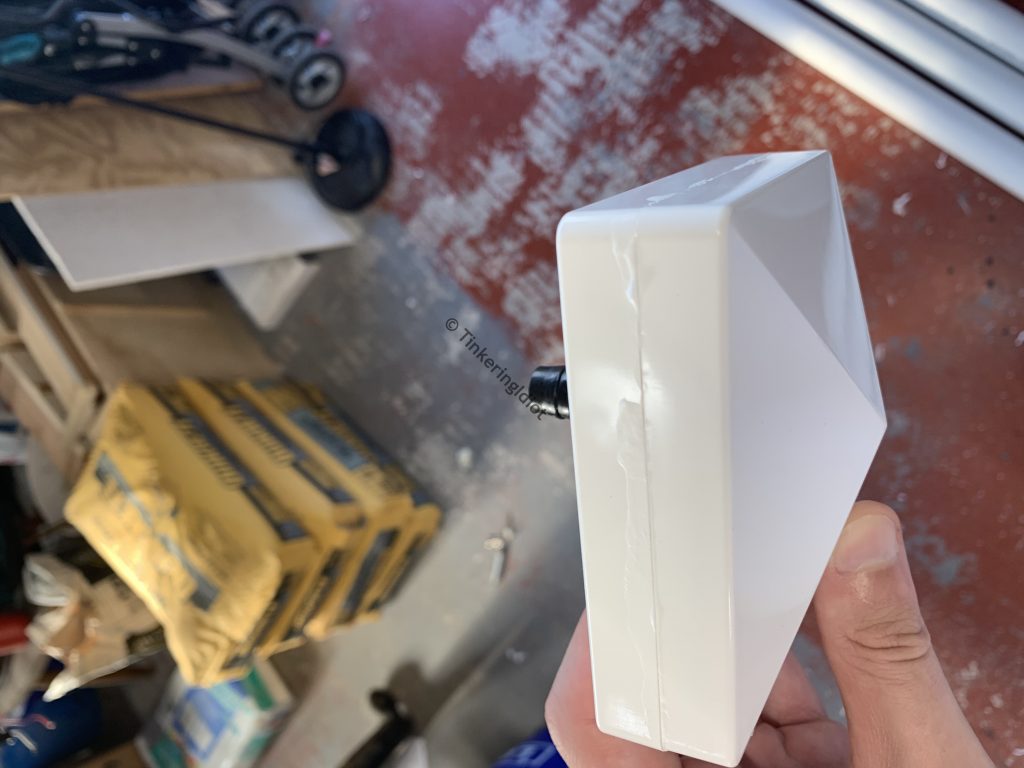
It all starts with a 4″ x 4″ vinyl fence post, 6 feet long.
I cut a small piece of 2″ PVC pipe at 45 degrees to make a cup holder. Size matters here, and I’m cutting each one to be maybe 1/4″ deep on the smallest edge while still leaving the entire round profile on the flat side.
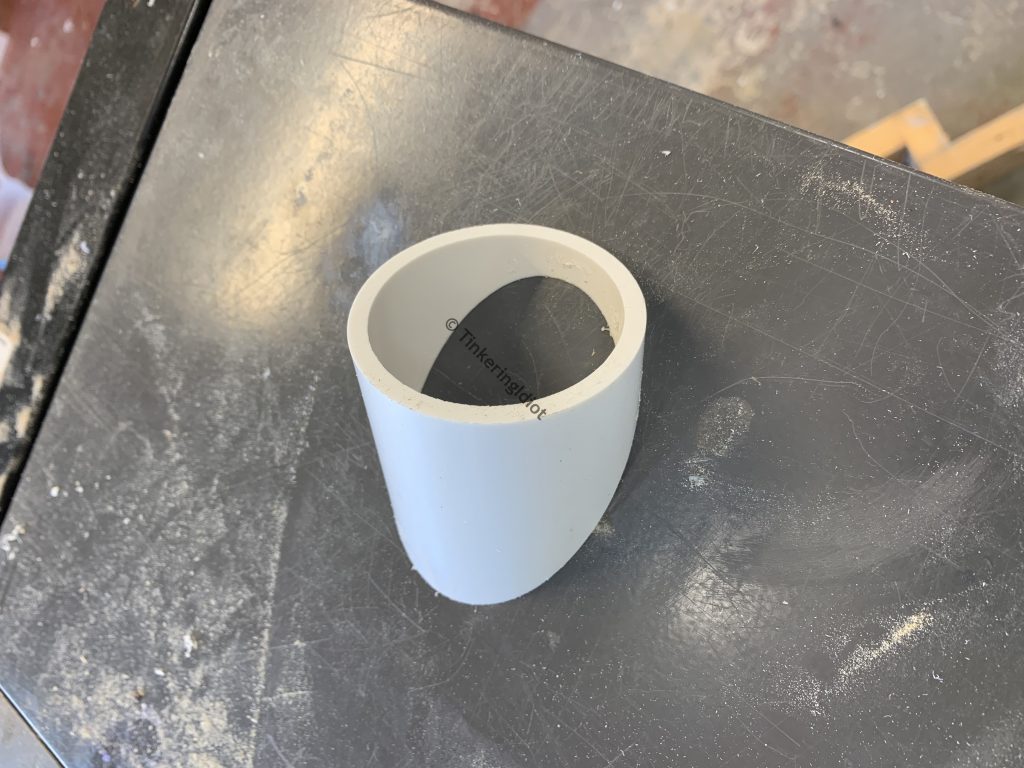
The general idea here is that I’ll cut a bunch of these cup holders, which will hold 2″ net cups with the plants in them. These are arranged around the tower, with the leafy bits out in the sunshine and the rooty bits inside drinking up the hydroponic fluid.
This first cup holder provides the template for the holes I need to cut in the tower. I place it on the tower body, and trace the inside (important!) with a marker. My towers will be living outside, so I’m only using three sides of the tower, but of course use all four if your application dictates.

I drill holes inside these ovals to make room for a jigsaw blade.

After some quality time with Mr. Jigsaw, again cutting to the inside of the lines, I’ve got…a bunch of oval holes.

I glue the cup holders on over each of the holes using vinyl fence cement. Normal PVC cement will probably also work (I’m pretty sure PVC is PVC whether it’s a pipe or a fence post), but I haven’t tried it. The vinyl cement works frighteningly quickly, so once you’ve got it on the cup holder, get it lined up fast. It also stinks like crazy so, you know, ventilate.
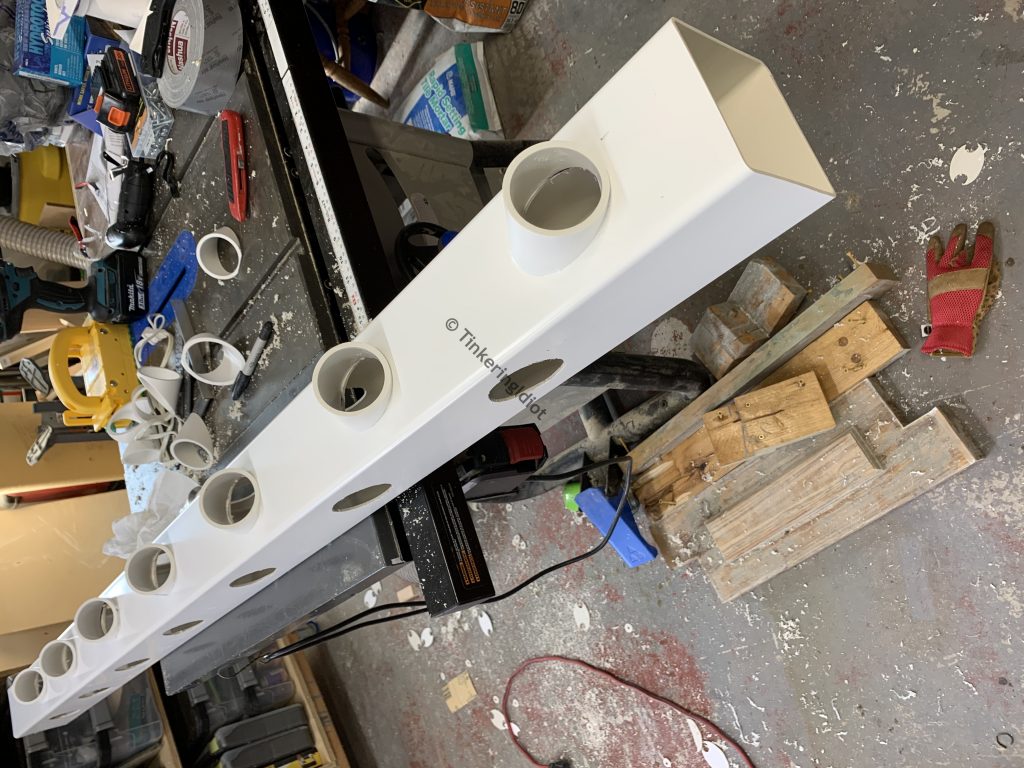
At this point, the function becomes clear, and I can judge my cup holder size guesstimates. I place a 2″ net cup in one of the holders, and as long as the bottom of the cup extends at least a little into the tower, it’s going to work just fine.

Then I glue on the rest of the cup holders.

Vinyl fence cement provides a good strong hold, but it’s been my experience that it doesn’t provide a perfect seal, and the cup holders may leak out the precious hydroponic goodness. As a final step, I run a bead of white silicone around the each cup.

Making Rain
Now that I’ve got a tower, I need some way to get the hydroponic fluid in, on to the plants, and back out again.
The cap is a fairly simple critter. I begin with a 4″ vinyl fence post cap. I drill a 1/2″ hole to fit a barbed T-fitting through the center.
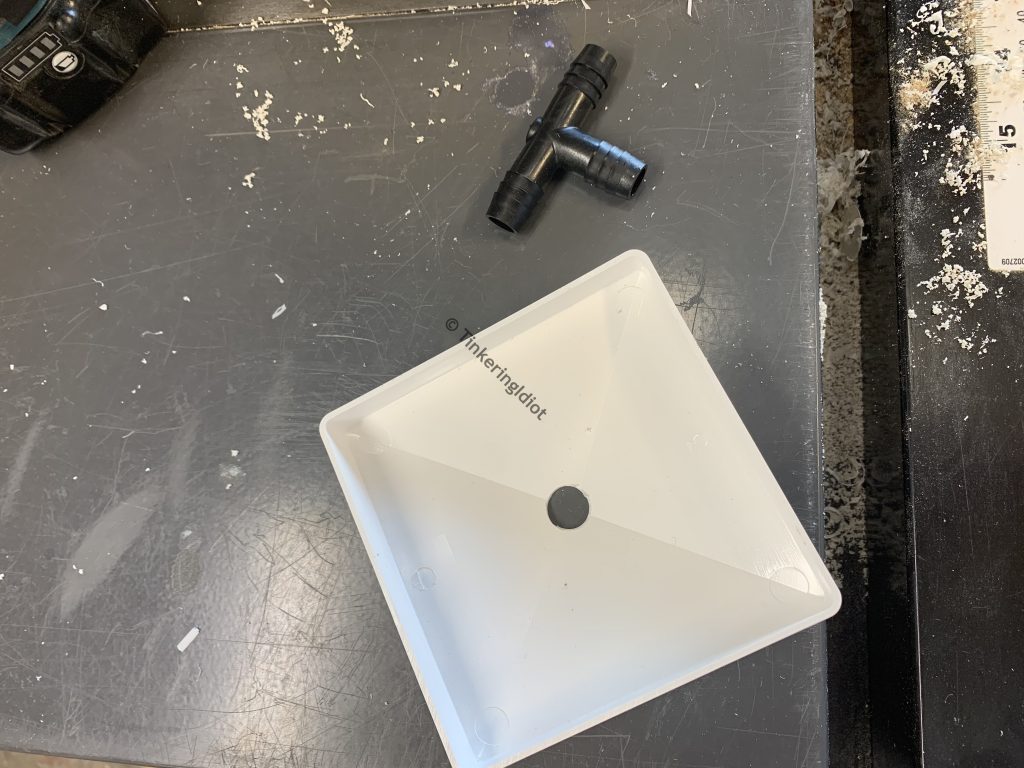
I follow this up with a bunch of smaller holes for the water to flow through. This makes the “rain” (which technically means this is aeroponic instead of hydroponic, but…potato tomato) inside the tower that feeds the plants. I left out a few holes on what will be the unused fourth side of the tower, since there will be no plants on that side.
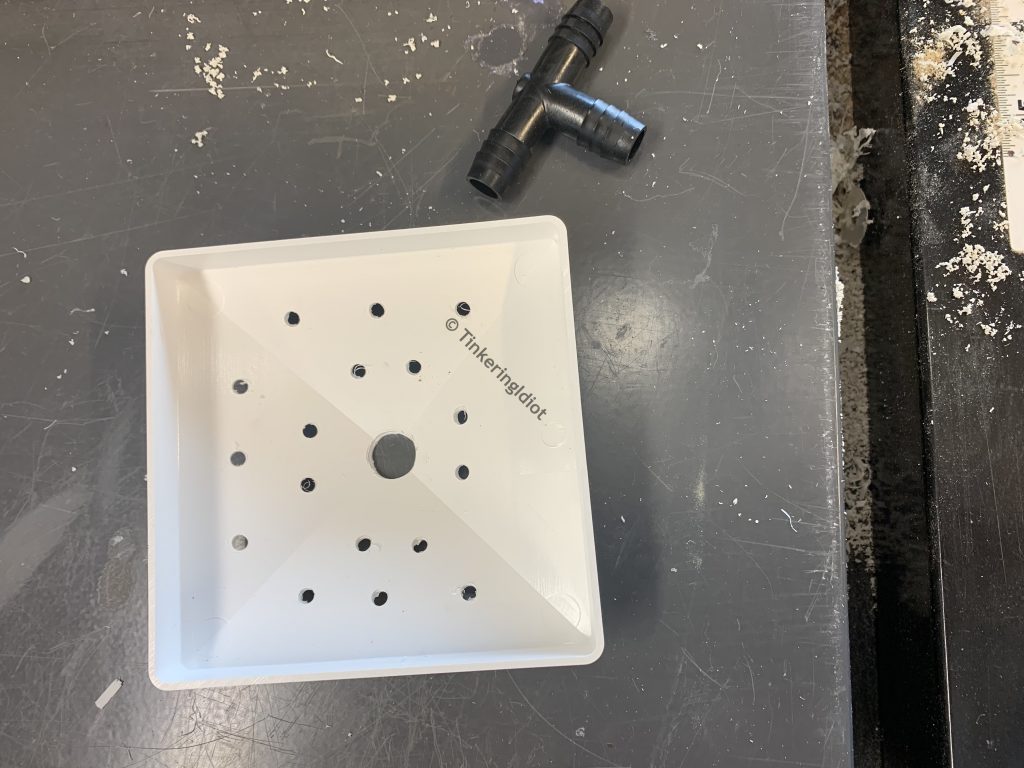
In goes the T-fitting with a healthy dose of silicone to seal around the center hole.

Finally, I seal it up with another 4″ vinyl post cap and some vinyl fence cement. I’ve tried a hinged approach in previous iterations of this tower, but that lead to constant frustration when the tops would blow open in the wind, solved only by the hinges rusting off. A glued-together approach works better for me.
The idea here is that I can connect a pump to the T-fitting with 1/2″ hose (run up through the tower), pump hydroponic nutrient fluid to the top of the tower, and it’ll rain down the inside on all the plants’ roots. Surprisingly enough, having done zero calculations around fluid flow, it works pretty well.
Catching What Falls
At the other end of the tower, I need a way to get what the plants don’t drink back to the reservoir. A lot of (probably more intelligent) people just stick the bottom of the tower into the reservoir itself. I’ve done this myself, and it works just fine. However, it doesn’t provide the tower much stability, so I had regular problems with afternoon storms blowing the tower over. This time I’m shooting for something a little more robust.
My drain design for the tower is, in my opinion, a thing of beauty, the part of this build that I’m maybe the most proud of. And, because I’m an idiot and didn’t take any pictures of building it, you’ll just have to take me at my word.
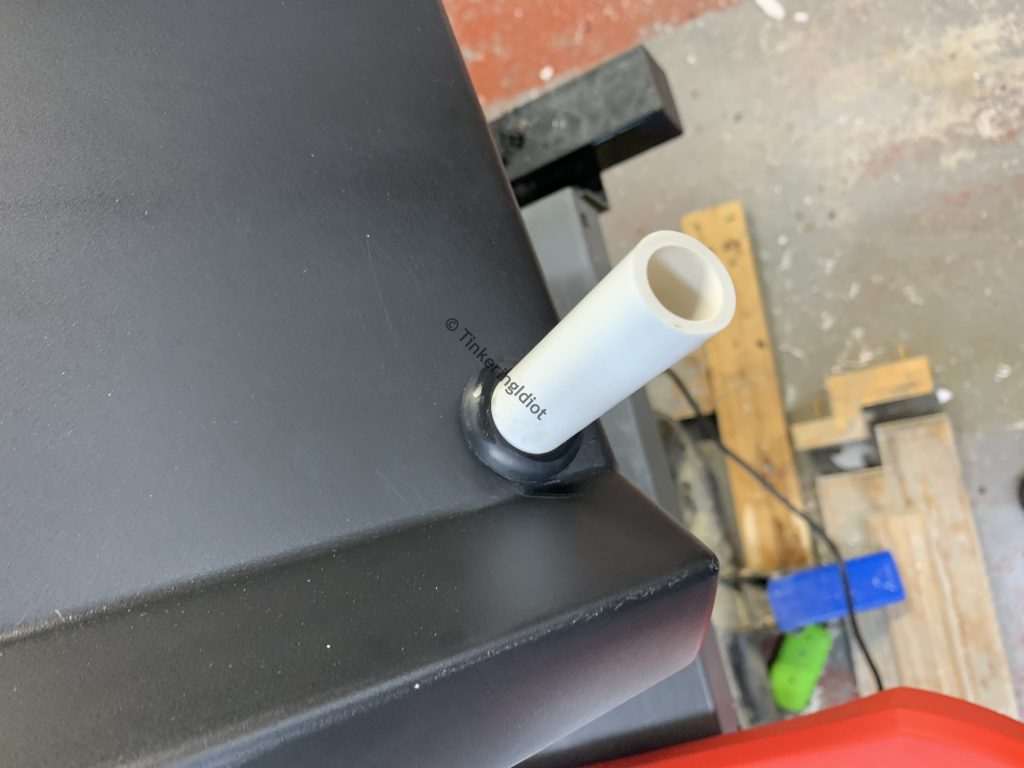
The drain is another 4″ end cap, this time with a 2 1/4″ hole in the center. Using a hole saw on PVC is tricky – the best way I’ve found is to run the bit forward until it’s through the PVC, then run the drill in reverse to put the hole saw through. This takes a bit longer, but it’s much less prone to snag the PVC and smack you with it, and also leaves a much neater hole. You may need to widen the hole a bit after cutting it, the idea is that 2″ PVC pipe will fit through snugly.
Next I cut 1/2″ off each end of a 2″ PVC coupler. This creates two perfect retaining rings to hold the pipe in the end cap, one on each side. The pipe goes through the end cap only as far as the retaining ring (which is glued on with purple primer and PVC cement), and the other retaining ring is glued on the other side. Once the glue cures, I fill in the gaps with silicone to stop any leaks.
Finally, I glue the whole thing on the bottom of the tower with vinyl fence cement, and silicone around the edges, creating a connection point for a drain pipe.
The Reservoir
Small scale hydroponic reservoirs are pretty much all the same – it’s a plastic tote with a couple of holes in it. Where the holes are, and how big, is a matter mostly dictated by where you’re putting the system, and how you want it to work.
Mine here is equally simple. I start with, of course, a plastic tote, 10 gallons in this case. I cut a 2 3/4″ hole in the top for the drain (again, running the hole saw in reverse – trust me on this).

A good reservoir should insulate the fluid inside to keep it from getting too hot in the day, and keep light out so algae doesn’t grow and choke things up. Here in Florida, there isn’t squat I can do about the heat (silver spray paint helps a little but…well, it’s Florida), but I can keep out the light.
Unfortunately, this red lid is basically translucent, and therefore, useless. Also, the helpful impression in the lid that enables these totes to stack nicely fills up with rain and sprinkler water, which I don’t want. So I fill it with styrofoam.

To seal out the light further, and keep the foam in place, I fill around the edges with spray foam.
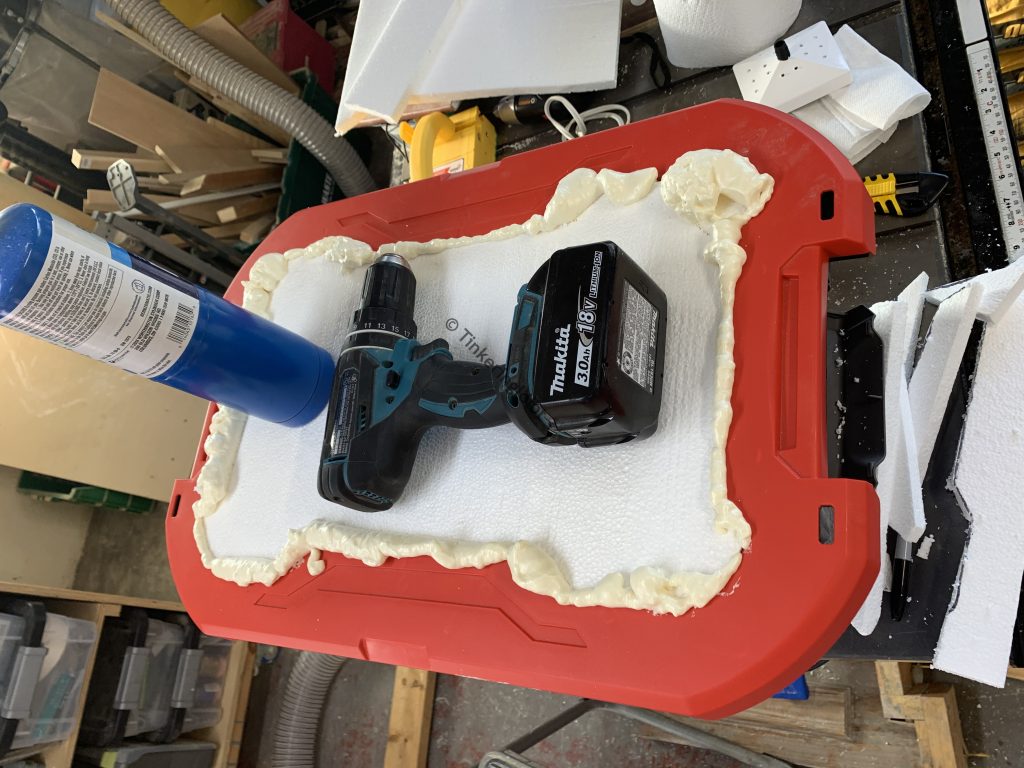
Then I cut out the drain hole. Plastic foam like this breaks down in UV, and it’ll last all of 30 seconds in the Florida sun, so I cover it up with aluminum foil and HVAC foil tape.
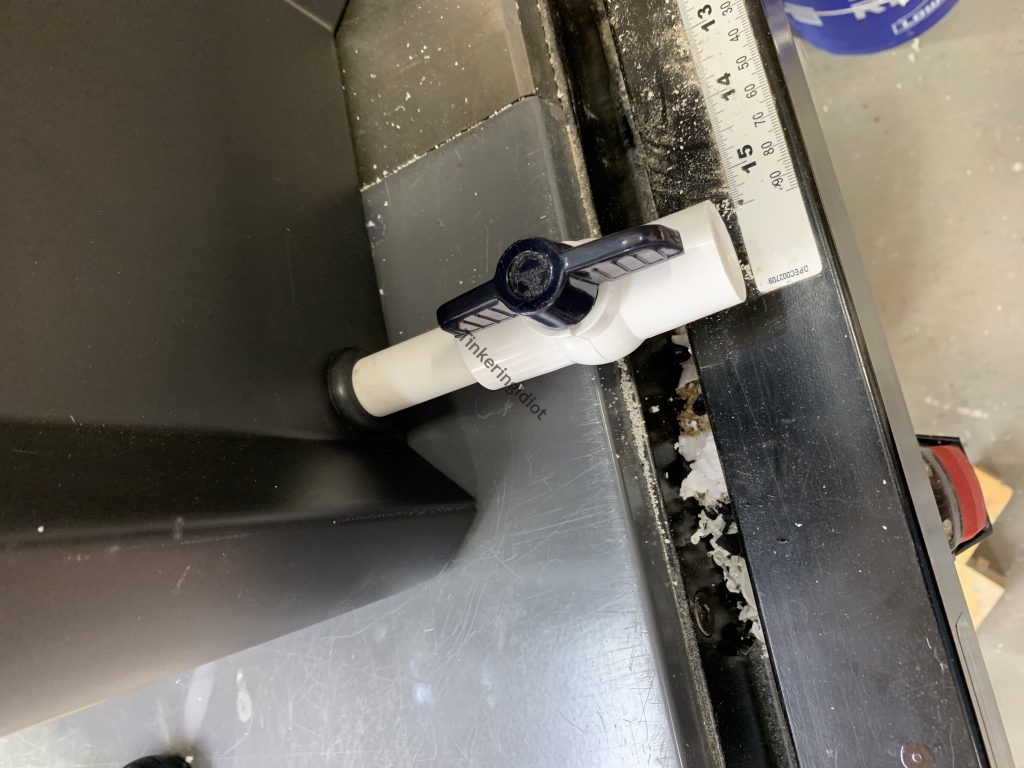
Hydroponic growing means changing out the fluid on a regular basis (because nothing says “maintenance free” like constantly obsessing over nutrient levels), so I also want a drain. For this, I drill a 3/4″ hole near the bottom with a spade bit. Into this goes this specific grommet, which fits perfectly.

The grommet fits very tightly around 1/2″ PVC pipe, creating a nice leak-free drain. Getting the pipe in can be tricky, but I’ve had success rounding over the edges of the pipe with a little sandpaper, then lubing it up with some Simple Green.
I glue a 1/2″ ball valve on the end of the pipe with some PVC cement to keep everything in until I want to drain it away.
I use submersible garden pumps that will live in the reservoir full time, so I cut a relief in the top edge of the tote to make room for the wires. And with that, the reservoir is done!

Putting it all together
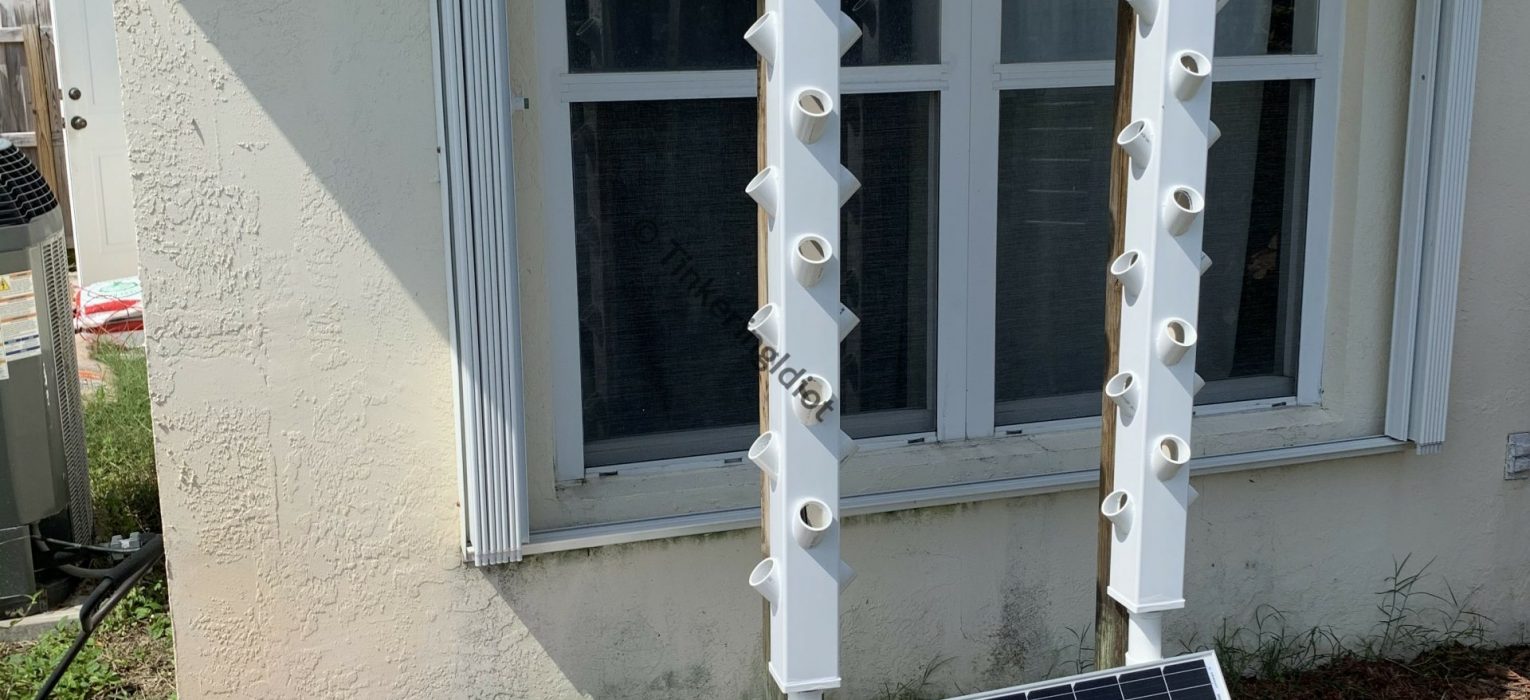
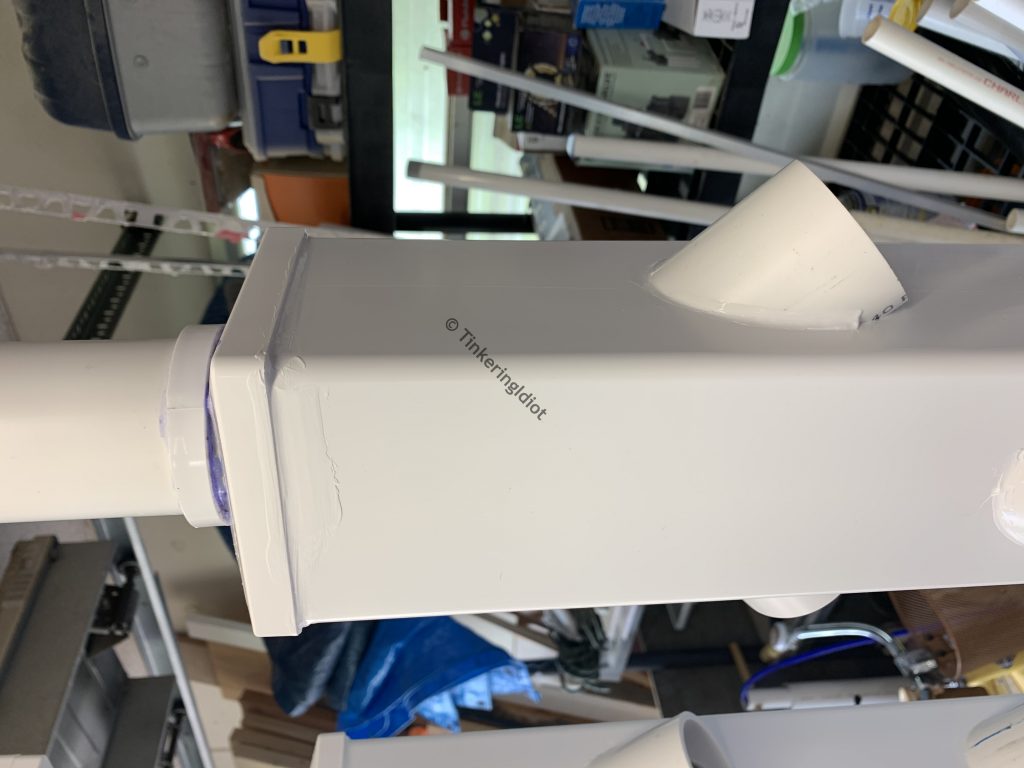
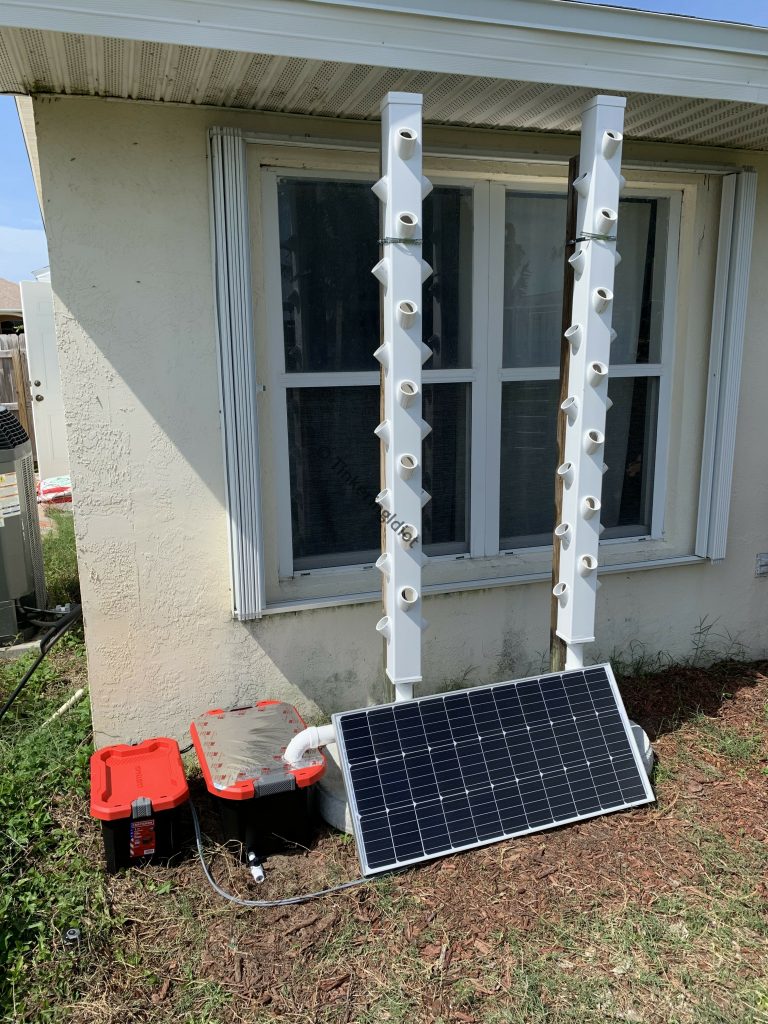
Now that I’ve got all the components done, it’s time to put them all together. I’ve got a site selected outside, just under the eaves of the house, which will hopefully provide a little shelter from the rain. Can’t have all that natural water polluting my agriculture, you know.
I had a couple of old 4″x4″ wooden posts laying around, and I sank them in concrete blocks. Each weighs over 100 lbs, so I’ll attach the towers to them and they won’t blow over in the wind (take that, nature!). Once I’ve got the towers mounted and positioned, I can run the pump hoses and finish up the drain line.
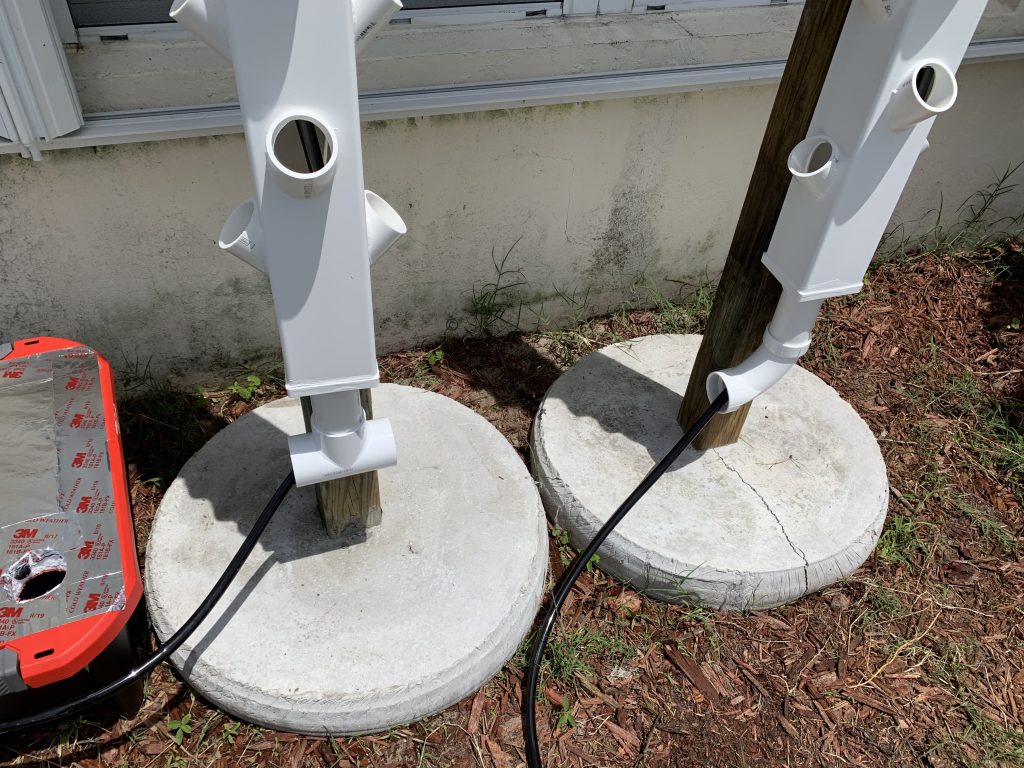
A little more 2″ PVC and a couple of fittings, and it’s done! A pair of towers ready to grow tasty strawberries!
Now if only I’d thought ahead and done this during strawberry season…


Franklyn
What size pump are you using or would recommend for up to 80 connecting towers
The Idiot
For my two 6 foot towers I use a 400GPH pump with a head height of about 7 feet and that’s just about perfect. I’m not an expert on pumps, but I believe for up to 80 towers you’d still need a head height at least as high as your towers, but much, much higher flow rate to account for all of them if you have them all running at once. You might be able to get away with a lower flow rate if you schedule your towers to only run a few at a time, though.
It’s worth noting that this is for centrifugal pumps. Piston pumps can generate a lot more pressure and achieve much greater heights with similar flow rates.